Wait what, why is Kris blogging MySQL ?!
This year our team will be doing a lot of projects with the MySQL team. There’s a lot of projects in the pipeline and will be a very fun year expanding the tools and products we build. For example, adding restful access to a MySQL Database as shown in this early screenshot.
@OracleREST + @MySQL 🦾 pic.twitter.com/cWGDHqZN6h
— krisrice 🏒🍺📷 (@krisrice) December 2, 2021
Install MySQL Community Server
This is all based on Oracle Linux 7. The first step is to getting a mysql server installed. This is just plain ‘ol mysql installations. The installation is outlined in the MySQL Server documentation here: Installing MySQL via Yum which makes it as simple as sudo yum install mysql-community-server
Once installed, it has to be started against based MySQL Documentation is here with the steps below.
# Start mysqld
sudo systemctl start mysqld

# Temp password for root@localhost was generated in the log file

sudo grep 'temporary password' /var/log/mysqld.log
... root@localhost: 0DeH6<qyax9k


# CHANGE THE PASSWORD !!!! root@localhost
mysql -u root -p
ALTER USER 'root'@'localhost' IDENTIFIED BY 'MyNewPass4#';

# Create a user "ADMIN" with network access
mysql -u root -p
CREATE USER 'admin'@'%' IDENTIFIED BY 'SuperPass5#';

# Grant privs to ADMIN
GRANT ALL PRIVILEGES ON *.* TO 'admin'@'%';
FLUSH PRIVILEGES;
Optionally, Install MySQL Shell (optional)
sudo yum install mysql-shell
Configure Network Access
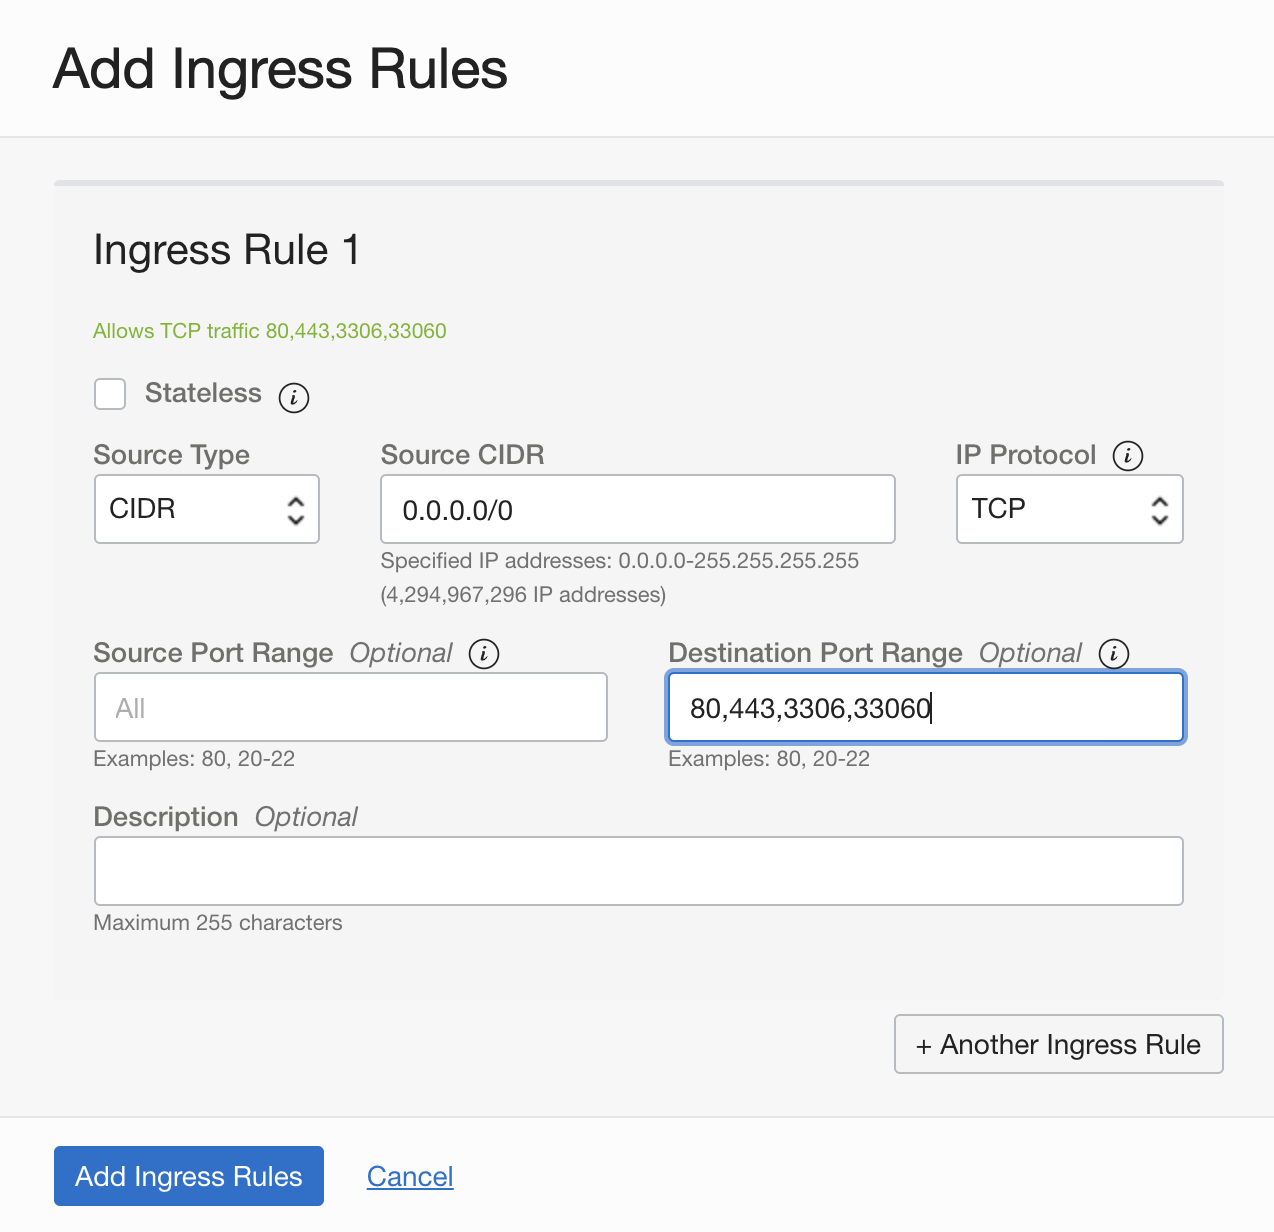
The linux firewall has to be opened to allow ingress to talk to the local MySQL server. This example is in Oracle Cloud which requires the the public subnet to have an ingress rule added in the security list of public subnet of VCN which allows TCP traffic to ports 3306 and 33060.
Then the compute node’s firewall needs to allow the same. This can be done with the use of firewall-cmd as follows.
sudo firewall-cmd --permanent --add-port=3306/tcp
sudo firewall-cmd --permanent --add-port=33060/tcp
sudo firewall-cmd --reload
Get TLS Certificate from Let’s Encrypt – https://letsencrypt.org/
I’ve covered in the past how to use Let’s Encrypt with ORDS In that post I had used GetSSL where this will use certbot Let’s Encrypt’s leverages the ACME protocol to add SSL to web servers. Their website outlines it here
Since the ACME protocol is geared to securing HTTP but adding HTTPS, there will need to be a webserver installed to perform the handshakes which will get the certificate issued and installed. This will use Apache httpd
The installation of httpd is quite simple.
sudo yum install httpd
sudo systemctl enable httpd
sudo systemctl start httpd
Create an index file to test if the server is running with from a browser.
sudo echo Hello > /var/www/html/index.html
Now Just like with MySQL, the Cloud Security list will need to allow ingress on ports 80 and 443.
Then the compute node’s firewall.
sudo firewall-cmd --permanent --add-port=80/tcp
sudo firewall-cmd --permanent --add-port=443/tcp
sudo firewall-cmd --reload
Get TLS Certificate from Let’s Encrypt – https://letsencrypt.org/
Now everything is setup to get an SSL Certificate issued. This example will use certbot which is probably the most popular integration path with Let’s Encrypt ( no proof just my feeling ). This will be installed via snapd
More about snap here
More about CertBot is here
# Enable the Linux Developer Repository
sudo yum-config-manager --enable ol7_developer_EPEL

# Install and Startup Snap
sudo yum install snapd
sudo systemctl enable --now snapd.socket
sudo snap install core
sudo snap refresh core
sudo ln -s /var/lib/snapd/snap /snap

# Install and setup certbot
sudo snap install --classic certbot
sudo ln -s /snap/bin/certbot /usr/bin/certbot
sudo certbot --apache
Deploy TLS Certificate to Apache – OPTIONAL
The goal here is to get the SSL Cert for MySQL which makes the actual installation of the certificate into httpd optional. Here’s those steps if you need HTTPS on the apache or just want to test that the same certificate can be leveraged by both httpd and MySQL.
Add following directives to /etc/httpd/conf/httpd.conf
<VirtualHost *:80>
    DocumentRoot "/var/www/html"
    ServerName mysql.example.com
</VirtualHost>
Update SSLCertificate configuration in /etc/httpd/conf.d/ssl.conf
SSLCertificateFile /etc/letsencrypt/live/mysql.example.com/cert.pem
SSLCertificateKeyFile /etc/letsencrypt/live/mysql.example.com/privkey.pem
SSLCertificateChainFile /etc/letsencrypt/live/mysql.example.com/chain.pem
Create and execute script /etc/letsencrypt/renewal-hooks/deploy/httpd-deploy.sh to deploy TLS Certificate to Apache
# Reload the new SSL httpd configuration
sudo systemctl reload httpd
Test from macOS: Check Apache Server TLS Certificate using OpenSSL
Now shifting to the local MacOS to test that the Security List ingress, firewall ingress, Apaache Httpd w/ SSL all work as expected. Install OpenSSL 1.1
# Use brew.sh to insall openssl
brew install [email protected]
Show Apache TLS Certificate using OpenSSL 1.1
/usr/local/opt/[email protected]/bin/openssl s_client -showcerts -connect mysql.example.com:443
CONNECTED(00000005)
depth=2 C = US, O = Internet Security Research Group, CN = ISRG Root X1
verify return:1
depth=1 C = US, O = Let's Encrypt, CN = R3
verify return:1
depth=0 CN = mysql.example.com
verify return:1
Deploy TLS Certificate to MySQL Server
Now to add the same SSL Certificate to the MySQL Server and have an encrypted path to communicate.
Configure /etc/my.cnf to use TLS Certificate
ssl_ca=/var/lib/mysql/chain.pem
ssl_cert=/var/lib/mysql/cert.pem
ssl_key=/var/lib/mysql/privkey.pem
Store root@localhost password in an obfuscated login path file (~/. mylogin.cnf) using MySQL Configuration Utility
sudo mysql_config_editor set --login-path=root@localhost --host=localhost --user=root –password

# Restart to take effect
sudo systemctl mysqld restart
Create and execute script /etc/letsencrypt/renewal-hooks/deploy/mysqld-deploy.sh to deploy TLS Certificate to MySQL Server
#!/bin/sh
domain=mysql.example.com
cert_dir=/var/lib/mysql
user=mysql.mysql
cp /etc/letsencrypt/live/$domain/cert.pem $cert_dir
cp /etc/letsencrypt/live/$domain/privkey.pem $cert_dir

# Only keep 1st certificate (C=US/O=Let's Encrypt/CN=R3), that is, get rid
# of 2nd certificate "ISRG Root X1" issued by "DST Root CA X3" which is expired.
# https://letsencrypt.org/2020/12/21/extending-android-compatibility.html

openssl x509 -in /etc/letsencrypt/live/$domain/chain.pem > $cert_dir/chain.pem
chown $user $cert_dir/*.pem
chmod 600 $cert_dir/*.pem
mysql --login-path=root@localhost --execute="ALTER INSTANCE RELOAD TLS"
Test from macOS: Check MySQL Server TLS Certificate using OpenSSL
Back to the MacOS and test the end to end encryption to MySQL. Same steps as before against 443 but now against 3306
/usr/local/opt/[email protected]/bin/openssl s_client -starttls mysql -showcerts -connect mysql.example.com:3306
CONNECTED(00000005)
depth=2 C = US, O = Internet Security Research Group, CN = ISRG Root X1
verify return:1
depth=1 C = US, O = Let's Encrypt, CN = R3
verify return:1
depth=0 CN = mysql.example.com
verify return:1
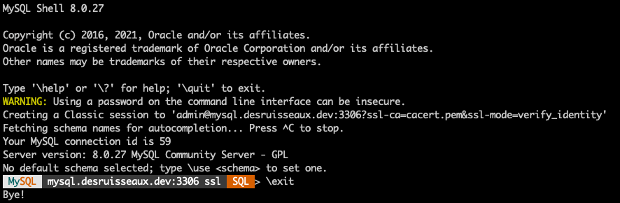
Test from macOS: Connect to MySQL Server using MySQL Shell
Now using the mysql shell to securely communicate from MacOS to the MySQL Server
Install MySQL Shell
brew install --cask mysql-shell
To Download CA certificates in PEM format from cURL web site to pass to mysqlsh for verification of the issuance of the certificate.
curl -sO https://curl.se/ca/cacert.pem
Connect to MySQL Server
mysqlsh --sql --ssl-ca=cacert.pem --ssl-mode=VERIFY_IDENTITY --user=admin --password=SuperPass5# mysql://mysql.example.com:3306